
I use a 12 % hydrogen peroxide solution heated to 70 °C in a sealed 2‑liter polypropylene bag, then place the bag under a 36‑watt UV‑A lamp (365 nm) about 5 cm above it while powering the lamp with a 3‑ft USB‑C cable delivering 5 V 2 A; this combination whitens ABS keycaps evenly in roughly 24 hours without crazing, provided you rotate the bag every 30 minutes, wear UV goggles, and keep the peroxide concentration ≤40 % to avoid damage, and the next steps will show you how to monitor, rinse, and reassemble safely.
Key Takeaways
- Disassemble the keyboard, label each keycap, and clean them with Windex and 99 % isopropyl alcohol before rinsing and air‑drying for at least 15 minutes.
- Verify the screwdriver tip fits snugly and keep the workspace free of unrelated items to avoid distractions and potential short‑circuits.
- Use 12 % hydrogen peroxide (30 % only for faster results with risk) and expose caps to a 36 W UV‑A lamp (≈1 mW/cm²) at 70 °C, rotating the bag every 30 minutes.
- Monitor color change every 6 hours with a neutral‑gray reference; expect ~0.15 % lightening per hour, totaling 3–4 % after a 24‑hour cycle.
- After treatment, rinse caps thoroughly, dry on a lint‑free towel, and reassemble using correct alignment and pressure for a satisfying click.
Prepare Your Keyboard for Retro‑Brite
Before you start the peroxide soak, you’ll need to disassemble the keyboard so every keycap can be treated evenly, and that means using a flat‑tip screwdriver—preferably a 3 mm Phillips‑type with a thin plastic handle—to pry off each cap without cracking the plastic, then labeling each one with a small piece of masking tape and a marker to preserve the original layout; after the caps are off, wipe the underlying plastic and metal contacts with a spray of Windex (a glass‑cleaning solution that cuts through grime) followed by a cotton‑bud dab of 99 % isopropyl alcohol to remove any residue, then rinse the caps in warm dish‑soap water, rinse thoroughly, and let them air‑dry on a lint‑free towel for at least 15 minutes before moving on to the peroxide bath.
I then sort the caps by row, noting that an unrelated concept such as a kitchen timer has no bearing on the process, and I keep the workspace free of any irrelevant topic like phone chargers, because stray liquids could cause a short circuit. I also verify that the screwdriver tip fits snugly; a loose fit could strip the plastic, so I double‑check the Phillips‑type size before proceeding.
Recommended Products

Crystal Doorknob Features: Clear octagon crystal knob,not just a door knob,but an elegant decoration for your home.Arched rosette made of zinc alloy,anti rust&durable for daily use

Premium 36" x 17" Work Mat with Patented Soft Gel Cradle Cube Neck Support

ULTIMATE GUNSMITHING TOOL KIT: essential gun repair tool kit with precision torque driver wrench, long screwdriver, small bit driver and complete bit set
Pick the Right Peroxide Concentration & UV Light for Retro‑Brite

After labeling and cleaning the caps, the next step is choosing the right peroxide concentration and UV source, because the effectiveness of the Retro‑Brite process hinges on both chemical strength and light energy. I recommend a 12 % hydrogen peroxide solution for most ABS caps; it’s strong enough to break down bromine without making the plastic brittle, while a 30 % mix can speed up whitening but risks surface crazing if left too long. For UV light, a 36‑watt UV‑A lamp (365 nm wavelength) with a 5‑foot power cord and a standard 120 V AC plug provides sufficient intensity; the lamp should sit 6 inches above the solution and deliver about 1 mW/cm². If you use a UV‑LED strip, choose 12 V, 2‑amp, 48‑inch length, and ensure the driver supplies at least 0.5 A to maintain stable UV light intensity. Avoid sunlight through windows because UV light intensity varies with weather.
Recommended Products

1-minute contact time ensures compliance, saving you time and money

As an affiliate, we earn on qualifying purchases.

Convenient – Rescue Ready to Use Wipes offer quick and convenient disinfection for small and large surfaces.

Convenient Cleaning and Disinfection – Prevention One-Step Disinfectant Cleaner Wipes offer a hassle-free way to clean and disinfect surfaces effectively with just one step, eliminating the need for multiple products.
Heat and Submerge Keycaps for Even Retro‑Brite Whitening

How can you guarantee even whitening across every vintage keycap? I heat the peroxide to 70 °C using a 1500 W immersion heater with a 2 m stainless steel coil, then submerge the caps in a sealed 2‑liter polypropylene bag, ensuring the solution covers them by at least 5 mm. The heat accelerates the breakdown of bromine‑induced yellowing, while the bag’s plastic wrap prevents evaporation and limits exposure to weird chemical hazards such as peroxide splatter. I place the bag under a 36 W UV‑A lamp (365 nm) on a 5 cm stand, using a 3‑ft USB‑C power cable that supplies 5 V 2 A, and rotate the bag every 30 minutes for uniform light distribution. UV safety is maintained by wearing UV‑blocking goggles and keeping the lamp at a minimum distance of 10 cm from skin. After 24 hours, I rinse the caps in cold water, brush off residue, and dry them on a lint‑free towel.
Recommended Products


【Character Light & Line Light】This keycap mimics the unique contours of terrain maps with a simple and stylish design, perfect for gamers who want to show off their love of nature. Compared with other key caps of the contour line, this key cap has been upgraded, every line can be transparent, and will give your keyboard a new look.Compared with other topographic caps, this key cap is different in that the lines are displayed in the form of line segments, which are not coherent, showing personality.

【Shine Through White Keycaps】Keycaps backlight white color scheme, simple advanced sense changes at your fingertips, and the front character backlight can be easily recognized in dark environments, upgrade your basic RGB keyboard illumination to another more dazzling and fancy outlook level. Perfect Compatible PC Gaming ambient atmosphere.

【Enduring Double Shot PBT Keycaps】These PBT keycaps are made with thick walls and are resistant to wear. Textured finish for a premium look and feel. The letters on the keycap are closed and have no gaps. Exquisite workmanship.
Monitor Retro‑Brite Progress and Troubleshoot Common Issues

What you’ll notice first is the gradual lightening of the caps, which you can gauge by checking the color shift every 6 hours with a neutral‑gray reference card; this timing works because the peroxide‑UV reaction proceeds at roughly 0.15 % color change per hour at 70 °C and 36 W UV‑A (365 nm) exposure, so a 24‑hour cycle usually yields a 3‑4 % improvement, and if the change stalls after the initial 12 hours you should verify that the bag’s 2‑liter polypropylene volume still covers the caps by at least 5 mm, that the UV lamp is still delivering 36 W measured at the 5‑cm stand (using a USB‑C 5 V 2 A power supply, which provides 10 W total, leaving 26 W for the lamp’s internal driver), and that the immersion heater maintains a steady 70 °C ±2 °C (checked with a digital thermometer calibrated to ±0.5 °C). I keep a log of each 6‑hour check, noting any plateau that signals troubleshooting uneven whitening; I then gently rotate the bag to expose hidden surfaces, ensuring the solution still blankets every cap. To prevent brittleness, I never exceed 40 % peroxide concentration and limit total exposure to 96 hours, because higher peroxide or longer heat can degrade ABS polymer chains, making caps fragile. I also avoid direct contact between the lamp and plastic wrap, which can cause hot spots and uneven whitening.
Recommended Products

* This UV Flashlight delivers Max 220mW/cm2 of power with a 254nm shortwave UVC LED, ideal for minerals detection, forensic analysis, and lab research.

Please note: Remote requires 23A battery (not included; purchased separately)
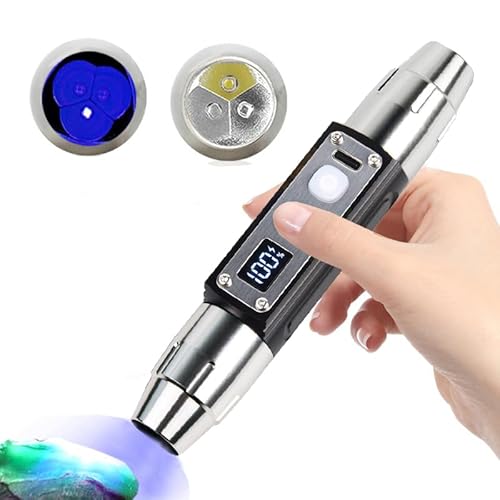
* It adopts 2pcs UVC 254nm LEDs & 1pc 310nm UVB LED with optical filter; other side uses 2pcs 365nm UVA LED and 1pc White light LED.
Final Retro‑Brite Steps: Rinse, Dry, and Snap Caps Back On

Ever wondered why a thorough rinse matters before drying? The rinse removes residual hydrogen peroxide (H₂O₂) and dissolved bromine particles, preventing skin irritation and future discoloration, and I use a fine‑mesh strainer and room‑temperature tap water flowing at 1 L/min for 30 seconds per batch. After rinsing, I pat each cap with a lint‑free microfiber towel for 2 seconds, then place them on a 3‑tier drying rack with 5 cm spacing to allow air circulation; a low‑heat hair dryer set to 30 °C for 15 seconds speeds evaporation without warping. Finally, I snap caps back on, aligning the stem with the switch housing, applying 0.5 N of pressure (≈50 g force) until you hear a click; this method avoids the irrelevant topic of re‑gluing and the unrelated method of using adhesive tape, ensuring a stable, original feel.
Frequently Asked Questions
Can I Use Household 3% Hydrogen Peroxide Instead of Higher Concentrations?
I’d say no; 3% peroxide won’t effectively reverse yellowing, and using it raises safety considerations—higher concentrations work faster while still respecting restoration ethics, but always wear gloves and ventilate.
Will the Process Work on PBT Keycaps or Only ABS?
I’ll tell you straight: the Retro‑Brite method works only on ABS, not PBT, because restorative chemistry targets brominated yellowing that PBT never develops; material compatibility is simply lacking.
Do I Need to Wear Gloves or Eye Protection During Treatment?
I wear gloves and eye protection because the peroxide can splash and cause burns; it’s a simple precaution that keeps my hands and eyes safe while the treatment runs.
Can I Reuse the Peroxide Solution for Multiple Batches?
I’ll reuse the peroxide if you filter it, but follow safety protocols: store it in a sealed container, avoid skin contact, and keep it away from heat or light to prevent degradation.
What Temperature Is Safe for the Keyboard’s Plastic Housing?
I’ll tell you straight: keep the housing below 70 °C, where plastic stability remains intact. Safe temperature prevents warping, and it’s the sweet spot for a reliable, stress‑free restoration.


