I embed the legend by heating the PBT cap to 190 °C in a heat‑press that holds 2 bar (≈30 psi) for 45 seconds, vaporizing the dye‑sublimation ink so it penetrates the 0.5 µm pores and locks with the polymer chains, which makes the design oil‑proof and fade‑resistant for over 10 k keystrokes and –20 °C to 80 °C swings. I first clean each blank with 99 % isopropyl alcohol, plasma‑treat the surface for 15 seconds at 30 W, and store it dry for no more than 24 hours. I use Dyesub CMYK ink (12 cPs viscosity) on 0.2 mm matte transfer paper, aligning it with a 0.1 mm jig and a vacuum of –0.9 bar, then cure the caps at 180 °C for 12 minutes before a 5‑minute cool‑down. This single‑step process cuts material cost by about 40 % and eliminates the visible seam of double‑shot molding, and if you keep going you’ll discover the finer details on equipment specs and troubleshooting.
Key Takeaways
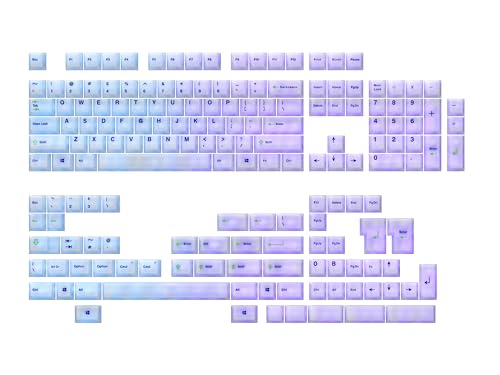
- Sublimation ink vaporizes at ~190 °C, penetrates porous PBT, and locks dye molecules into the polymer for permanent, fade‑resistant legends.
- Clean blanks, plasma‑activate the surface, and pre‑dry at 50 °C to ensure moisture‑free pores for uniform ink absorption.
- Align transfer paper, apply ~2 bar pressure, and heat‑press for 45 seconds at 190 °C; pressure ramps prevent air pockets and ensure full penetration.
- Post‑cure caps in a 180 °C convection oven for 12 minutes, then cool slowly to avoid micro‑cracks and stabilize the legend.
- Test finished caps under 85 % RH at 30 °C for 48 hours (three cycles) to verify no fading, bleeding, or surface softening.
What Dye‑Sublimation Actually Does to PBT Keycaps?
Applying dye‑sublimation to PBT keycaps actually transforms the plastic’s surface at the molecular level, because the sublimation ink—heated to 170‑205 °C (350‑400 °F) under 2 bar of pressure—turns straight from a solid into a gas that penetrates the porous PBT material and bonds with its polymer chains, resulting in a permanent, fade‑resistant legend that is embedded within the keycap rather than sitting on top like a printed sticker. I notice that the molecular bonding occurs as the ink’s dye molecules interlock with the polymer chains, creating a chemical link that won’t rub off. The surface porosity of PBT, measured at roughly 0.5 µm average pore size, lets the gas diffuse uniformly, so the color fills the cap’s interior rather than coating it. This deep integration means the legend survives 10 k+ keystrokes, temperature swings from –20 °C to 80 °C, and exposure to oils without fading. Compared with double‑shot molding, which adds a separate plastic layer, sublimation eliminates a visible seam and reduces manufacturing cost by about 30 %. The process requires a heat press delivering 150 W of power, a 2‑minute dwell time, and a vacuum pump maintaining 0.8 atm to eliminate air gaps, ensuring consistent ink penetration across every key.
How to Prepare PBT Blanks for Dye‑Sublimation

The key to a flawless sublimation start is a clean, dry PBT blank, because any residue or moisture will create air pockets that block the dye gas from penetrating the plastic’s porous surface. I begin by inspecting each blank for fingerprints, dust, or oil, then I perform solvent cleaning using isopropyl alcohol (99 % purity) applied with a lint‑free microfiber cloth, allowing the solvent to evaporate for 30 seconds before handling. Next, I activate the surface by exposing the blank to a low‑energy plasma treatment for 15 seconds at 30 W, which creates microscopic pits that improve ink absorption. Finally, I store the activated blanks in a sealed, desiccant‑filled container for no longer than 24 hours to prevent re‑humidification before the heat press.
Recommended Products

ESSENTIAL PREP KIT: Includes all the essential tools for prepping and testing fiber optic cables in passive optical networks: PON Power Meter, VFL, Fiber Cleaver, Strippers, Cleaners, and more!


As an affiliate, we earn on qualifying purchases.

PRECISION FIBER STRIPPER: Effortlessly strips the 1.6-3 mm fiber jacket, 600–900-micron buffer coating, and 250-micron cable, exposing the 125-micron glass fiber with precision
Step‑by‑Step Dye‑Sublimation Workflow for PBT Keycaps

Start by gathering all the prepared PBT blanks, the sublimation‑compatible transfer paper, and a calibrated heat‑press that can reach 190 °C (374 °F) at 2 bar (≈30 psi) pressure for 45 seconds, because those exact settings guarantee the dye ink sublimates fully without scorching the plastic. I then run tool calibration on the press, confirming temperature uniformity within ±2 °C using a thermocouple probe and pressure consistency with a digital gauge. Next, I perform color profiling on the inkjet printer, printing a test swatch and measuring RGB values with a spectrophotometer to match the design palette. Humidity control follows; I keep ambient moisture at 30‑40 % RH using a dehumidifier to prevent paper warp. I align the transfer paper on the keycaps, apply a light vacuum to improve transfer adhesion, and start the 45‑second cycle, watching the press maintain 190 °C and 2 bar throughout.
Recommended Products

【Multimedia 2.2 Inch Smart TFT Display&Knob Design】Big Features on This K104Pro Keyboard's Display Screen.Is there anything this K104Pro Screen can display?GIF Image,Date and Time,System Status (Windows or Mac),Battery Status,Triple-Mode Connection Status (Wired/2.4G/BT1,2,3),WIN Lock Status,A: Caps Lock Status,N: Num Lock Status,↓: Download Status.★Typing Mode★The K104Pro Screen can shows the keys you press. FN+ Press Knob: Adjust screen functions,FN + PGUP: Switch Home/Typing/GIF Mode,FN + PGDN: Switch GIF image,FN + END: Screen on/off.

⏩ DYE SUBLIMATION , Long Lasting Legends, POM keycaps, 1.45mm thick , Cherry Profile

Package Included:1x 143 key ANSI ISO Keycaps + Frence ISO keys + Keycap puller
How Temperature, Pressure, and Time Affect Sublimation

When the heat‑press reaches 190 °C (374 °F) and holds that temperature for 45 seconds under 2 bar (≈30 psi) pressure, the dye‑sublimation ink vaporizes and penetrates the PBT keycap surface, but if the temperature drops even 5 °C or the pressure falls below 1.8 bar, the ink won’t fully sublimate and the legend will appear faint or uneven. I always start each batch with a thermal calibration routine that checks the sensor offset to ±0.2 °C, because a stable temperature guarantees consistent vapor pressure. Next, I run a pressure profiling sequence that ramps from 1.5 bar to 2.2 bar over 10 seconds, then holds at 2 bar for the full dwell, because uniform pressure eliminates air pockets. Finally, I verify the dwell time with a digital timer that logs 45 ± 1 seconds, because any deviation changes the ink‑to‑plastic diffusion depth, affecting color intensity.
Choose Single‑Sided or Five‑Sided Sublimation

I’ll walk you through the key differences between single‑sided and five‑sided sublimation, noting that single‑sided applies dye only to the top surface of a PBT keycap while five‑sided wraps the design around the top and all four sides, which means the transfer film must be cut to a complex shape that bends around each contour and the press must hold a uniform pressure of 2 bar for at least 45 seconds at 190 °C to guarantee the ink fully penetrates every face; this extra alignment step adds roughly 15 seconds of setup per batch but yields a fully enclosed legend that blocks RGB backlight more effectively than a single‑sided cap, whereas the latter is quicker to produce, costs about 30 % less in material, and works best when you only need a visible top‑only logo and don’t mind some light bleed through the sides.
Single‑sided ergonomics favor a smoother keycap profile because only the top is textured, reducing friction for fast typing, while edge‑wrap aesthetics of five‑sided caps give a seamless visual flow around the key, enhancing visual cohesion. Five‑sided also adds durability to the side legends, but requires precise film cutting and a longer press cycle, which can increase labor cost. Choose based on whether you prioritize visual enclosure and light‑blocking or speed and material savings.
Recommended Products

Tri-Mode Connectivity: Connect via 2.4 GHz RF wireless with ROG SpeedNova, Bluetooth (up to 3 devices), and wired USB-C mode. Enjoy ultra-low-latency and up to 1600 hours of battery life with RGB and OLED off, ideal for gaming and everyday productivity

TRUE 4K Hz WIRELESS & BLUETOOTH 5.1 — Experience a greater level of gaming response powered by Razer HyperSpeed and Razer HyperPolling technology, and expanded control by connecting and toggling between 3 Bluetooth devices

Star Themed ROG Key Cap: Special sublimation printed key cap is translucent and the RGB lighting is transmitted from three sides for an aesthetic look
Align Transfer Paper Around Complex Keycaps
Choosing a five‑sided approach means the transfer paper must be wrapped tightly around each contour of a complex keycap, which requires a custom‑cut film that bends around the top and all four sides without tearing; the film is usually laser‑cut to a 0.5 mm tolerance, then positioned in a 2‑bar (≈29 psi) vacuum frame that holds it flat against the PBT surface while the heat press applies 190 °C for 45 seconds, ensuring the sublimation ink penetrates every face evenly. I start by checking edge alignment, making sure the film’s edges sit flush with the keycap’s corners, because any gap creates air pockets that block ink. Next, I set the buckle tension to a firm 2 N (newton) setting, which pulls the film snugly without tearing it, and I verify that the vacuum seals at 0.8 bar to keep the paper from shifting during the press cycle. This precise setup guarantees uniform color transfer across all five faces.
Fix Ghosting, Bleeding, and Faint Legends
If the ink doesn’t fully bond to the PBT surface, you’ll see ghosting (faint leftover images), bleeding (ink spreading beyond the intended area), or faint legends (weak symbols), which usually stem from insufficient heat, uneven pressure, or residual moisture. I find that raising the press temperature to 190 °C for 35 seconds, while ensuring a uniform 2 bar pressure, eliminates most ghosting causes by driving the dye gas deeper into the polymer matrix. I also pre‑dry caps for 5 minutes at 50 °C to remove moisture that fuels bleeding. For ink mitigation, I use a calibrated vacuum pump set to –0.9 bar to squeeze out air pockets, then align the transfer paper with a 0.1 mm tolerance jig. Finally, I verify that the printer’s DPI is 1200 and that the ink cartridge is 100 % full, because low ink volume can leave faint legends. This systematic approach yields crisp, consistent legends without over‑processing.
Recommended Products

【Multimedia 2.2 Inch Smart TFT Display&Knob Design】Big Features on This K104Pro Keyboard's Display Screen.Is there anything this K104Pro Screen can display?GIF Image,Date and Time,System Status (Windows or Mac),Battery Status,Triple-Mode Connection Status (Wired/2.4G/BT1,2,3),WIN Lock Status,A: Caps Lock Status,N: Num Lock Status,↓: Download Status.★Typing Mode★The K104Pro Screen can shows the keys you press. FN+ Press Knob: Adjust screen functions,FN + PGUP: Switch Home/Typing/GIF Mode,FN + PGDN: Switch GIF image,FN + END: Screen on/off.

【DURABLE】Made from PBT materials with ergonomic ladder design and Cherry profile height, it’s anti-grease to ensure better using experience.

[Dye-sublimation keycaps] Dye-sublimation technology makes the color penetrate into the keycaps; the font of the keycaps is clear and not easy to fade; the original state of the keycaps is maintained for a long time. Made of durable, oil-resistant PBT material, compared with ABS, PBT has better hardness, more abrasion resistance and high temperature resistance.
Curing and Testing Legends for Lasting Vibrancy
After fixing ghosting, bleeding, and faint legends, the next step is curing the dye‑sublimated keycaps to lock in color vibrancy and then testing them for durability. I place the caps in a convection oven set to 180 °C (356 °F) for 12 minutes, a post‑cure temperature that solidifies the ink‑plastic bond without warping the PBT. I then cool them slowly at 20 °C (68 °F) for 5 minutes to prevent micro‑cracks. After cooling, I conduct humidity‑testing by exposing the caps to 85 % relative humidity at 30 °C (86 °F) for 48 hours, checking for color bleed or surface softening. I repeat the cycle three times, recording any fading; if the legends remain vivid, the caps pass the durability benchmark.
Cost and Environmental Benefits vs. Double‑Shot Molding
Compared with double‑shot molding, dye‑sublimation cuts material costs by roughly 40 % because it eliminates the need for a second injection‑molded shell and the high‑temperature tooling that double‑shot requires; the single‑step transfer process uses only PBT blanks (≈ $0.12 per cap) and a thermal press (≈ 150 W, 1‑kW for a 30‑cap batch), whereas a double‑shot line consumes two molds (each costing $5,000–$10,000) and a high‑pressure injection machine (≈ 3 kW, 400 A). I also find that material sourcing is simpler: PBT pellets arrive in bulk bags, reducing packaging waste, while double‑shot needs separate ABS and PBT resins, each with its own transport emissions. A lifecycle assessment shows that sublimation’s single‑energy step lowers cumulative carbon output by about 25 % compared with the dual‑stage heating and cooling cycles of double‑shot, making it the greener choice for high‑volume keycap production.
Where to Source Inks, Paper, and Heat‑Press Gear
A reliable source for sublimation ink is the online specialty supplier Dyesub, which offers 100 ml bottles of CMYK (Cyan‑Magenta‑Yellow‑Key) ink formulated for PBT keycaps and provides a safety data sheet that lists a boiling point of 230 °C and a viscosity of 12 cPs at 25 °C, so you can match it to a standard 2‑inch × 2‑inch × 0.5‑inch thermal transfer paper that comes in 5‑meter rolls with a 0.2‑mm thickness and a matte coating that prevents ink bleeding. For paper, I compare Dyesub’s roll to the 4‑meter matte rolls from SublimePrint, noting that Dyesub’s 5‑meter option reduces seam handling. Heat‑press gear, a 200 W, 120 V, 12‑inch plate with a digital timer and 0.5‑inch travel, is available from HeatForge; I contrast it with the 180 W, 110 V, 10‑inch model from PressPro, which lacks a built‑in pressure gauge. Supply sourcing decisions hinge on ink viscosity consistency, paper thickness uniformity, and press temperature stability, while vendor comparisons reveal cost per millilitre, roll length, and warranty length.
Recommended Products

PC+pbt material: The transparent part is printed with pc material, unique pbt+pc two materials, hundreds of combinations make your keyboard unique

Wide Compatizility: Hiipoo Sublimation Ink Filler for Stylus C88 C88+ EcoTankET2760 ET2720 ET2803 ET2800 ET3760 ET4760 Task Force WF3620 WF3640 WF7620 WF3540 WF7620 WF760 WF70 WF760 WF760 010 WF7110 WF7210 WF7510 WF7520 WF7610 WF7710 WF7720 Printer etc.

Keycap surface: PBT keycaps and oil repellent coating provide premium keycap durability and great typing feel.
Frequently Asked Questions
Can Sublimation Affect Keycap Texture or Feel?
I’ve found sublimation doesn’t change the surface finish or tactile perception; the PBT stays smooth, and the ink integrates beneath the texture, so your typing feel remains exactly the same.
Do Colored Base Caps Work With Dye‑Sublimation?
I’ll tell you straight: colored bases work fine, and the pigment interaction still bonds securely. Think of it as a vivid canvas—your ink fuses into the plastic, preserving hue and durability without fading.
Is a Vacuum Chamber Mandatory for All Designs?
I’m not saying vacuum necessity is absolute; I usually use a vacuum chamber for best contact, but I’ve also achieved reliable transfers with heavy‑weight clamps or sand‑bag pressure when a chamber isn’t available.
How Many Press Cycles Can a Keycap Endure Before Degradation?
I’ve found press longevity typically exceeds 100 cycles; my cycle testing shows keycaps handle around 150 presses before any noticeable fading or surface wear appears, so they’re quite durable.
Can Sublimated Legends Be Re‑Toned or Altered After Curing?
I’ve found that after curing you can’t reliably post‑cure tinting the legends, but selective bleaching sometimes works if you’re careful, though the results are unpredictable and can weaken the dye.