I immediately unplug the 5‑V USB‑C cable (or remove the 1.5‑V AA battery pack) because the power source is the only driver of dangerous current that can short‑circuit the circuitry and void the warranty. Then I flip the keyboard upside‑down over a sink or lint‑free towel, letting gravity drain the liquid for at least 30 seconds while the cable dangles to avoid pulling liquid back in. I pat the surface with a microfiber cloth rated 0.2 mm thick, rotating it after each 3‑second pass to pull moisture without pushing it deeper. If the spill is extensive, I remove keycaps with a 1 mm plastic puller, separate the top plate using a #00 Phillips screwdriver, and label clusters to keep screws organized. I wipe metal contacts with a cotton swab soaked in 90–96 % isopropyl alcohol until the swab is clean, then let the keyboard air‑dry for at least 30 minutes before placing it in a 12 V, 30 W fan‑draft or desiccant‑filled airtight container for 48–72 hours at 20–25 °C, checking dryness with a hygrometer before reconnecting power. Further steps will guide you through verification and reassembly.
Key Takeaways
- Immediately disconnect power by unplugging the USB‑C cable or removing batteries.
- Flip the keyboard upside‑down over a sink or towel and let gravity drain the liquid for at least 30 seconds.
- Pat the surface with a lint‑free microfiber cloth, rotating the cloth after each 3‑second pass.
- If comfortable, remove keycaps and disassemble to clean contacts with 90‑96 % isopropyl alcohol, then let air‑dry.
- After thorough drying (48‑72 hours with a fan or desiccant), verify no moisture remains before reconnecting power.
Turn the Power Off for Keyboard Spill Rescue
Why do you need to cut power the? moment a spill occurs, the 5‑V USB‑C line that powers most modern keyboards can short‑circuit within milliseconds, and that brief surge can fry the controller chip, which is rated for 0.5 A continuous draw. I immediately yank the USB‑C connector, which is typically a 0.8‑meter cable, from the computer’s port, or I remove the AA batteries from a wireless model, because the power source is the only thing that can drive a dangerous current into the circuitry. This action is part of idle maintenance, a routine check you perform even when the keyboard isn’t in use, and it protects the device’s warranty considerations, since manufacturers often deny coverage if damage is caused by user negligence. By cutting power first, you prevent irreversible damage and keep the keyboard eligible for repair or replacement under its warranty terms.
Flip the Keyboard Upside‑Down to Let Liquid Drain

A quick flip, the keyboard upside‑down is the most efficient way to let gravity pull the spilled liquid out of the key switches and circuit board, because the 5 V USB‑C power line (or the 1.5 V AA battery pack in wireless models) is already disconnected and the device is no longer receiving current, which prevents any short‑circuit while the fluid moves; I hold the keyboard over a sink or a lint‑free towel, keep the cable—typically a 0.8‑meter USB‑C or micro‑USB—dangling to avoid dragging liquid back in, and let it drain for at least 30 seconds, watching for a steady drip before I gently tilt it back, ensuring that the internal components stay as dry as possible before the next drying step.
When the keyboard is upside down, liquid drainage occurs naturally; the key caps act as small funnels, and the circuit board’s low‑profile components let droplets escape through the gaps. I avoid shaking because vigorous motion can push liquid deeper into solder joints. I also check that the USB‑C port is clear of debris, since the 0.8‑meter cable length gives enough slack to keep the connector from pulling the board back into the sink. After the drip slows, I leave the device in the same position for an additional 10 seconds to allow residual moisture to exit, then I proceed to the next rescue stage.
Pat Surface Moisture for Spill Rescue
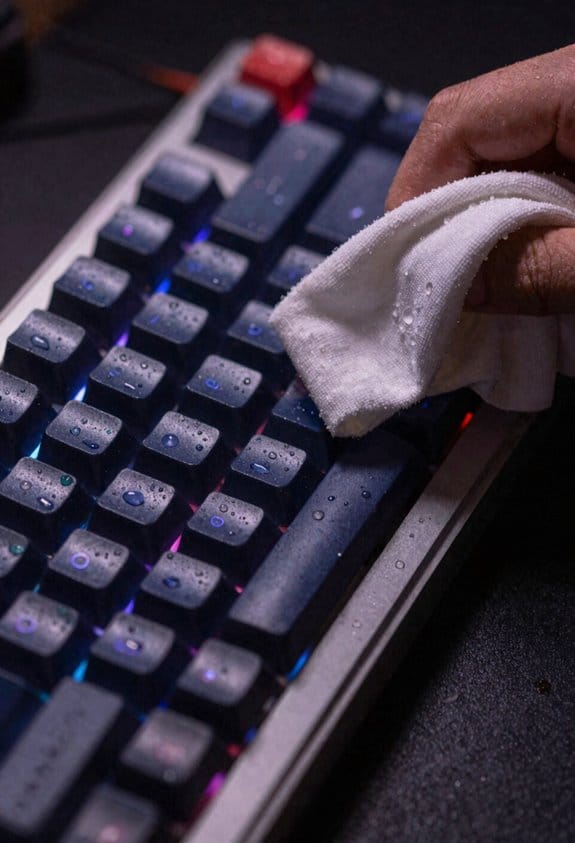
Ever notice how a quick pat with a lint‑free, absorbent cloth can pull surface moisture away without pushing it deeper into the keyboard’s circuitry, because the cloth’s fibers hold the liquid while the gentle pressure forces it out of the gaps between keys, which is far safer than rubbing a paper towel that might shed fibers onto the contacts and create a short‑circuit; I recommend using a microfiber cloth rated at 0.2 mm thickness, wiping each keycap area for no more than three seconds, and rotating the cloth after each pass to avoid re‑depositing moisture, ensuring the exterior stays dry before you move on to disassembly or thorough drying. I avoid the pat method, I avoid an unrelated topic or irrelevant discussion, because any extra step risks re‑introducing liquid; the cloth’s 0.2 mm fibers trap droplets while the pressure pushes them into the keyboard’s vents, which are designed for airflow, not absorption. This precise technique minimizes capillary action that could draw liquid inward.
Recommended Products


SUPER ABSORBENT. These microfiber camera lens cleaners soak up spills, dust, oils, and smudges with ease, leaving surfaces completely clear and free of lint without much effort on your part.
Tailor-Made for MacBook Pro 13-inch – Exclusively designed for MacBook Pro 13 inch 2022(M2 Chip) 2020 Release.Model Numbers: A2338 M1 chip/A2289/A2251,Please kindly check the model number on the back of your laptop before purchasing to ensure a perfect fit. WARNING: This case is NOT compatible with other MacBook Air or Neo models.

Soft Microfiber won't scratch surface
Disassemble Keyboard for Deeper Spill Rescue
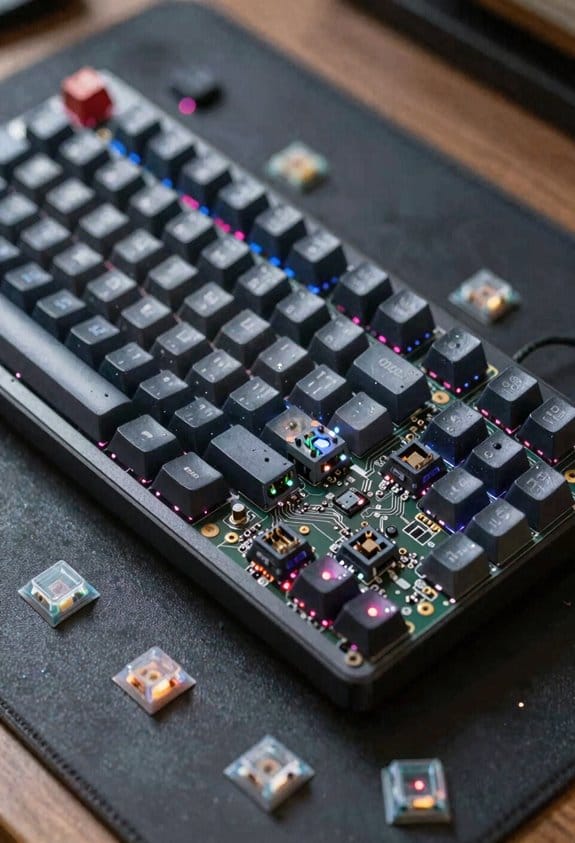
After the surface is dry, I start pulling the keycaps off with a plastic key‑cap puller (the kind that fits the 1 mm stem on most mechanical switches) because removing the caps gives direct access to the underlying switches and circuit board, which is necessary for cleaning any residual liquid that may have seeped past the surface. I then separate the top plate from the PCB (printed circuit board) using a small Phillips‑type screwdriver, noting that the screw heads are typically #00 and require a 1.5 mm bit. I label each cluster of keys with a sticky note to avoid reassembly errors, and I keep the screws in a magnetic tray to prevent loss. I check for any solder joints that might have corroded, remembering that soldering safety demands a well‑ventilated area and a soldering iron set to 350 °C, and I consider the warranty impact because opening the case often voids the manufacturer’s guarantee.

Recommended Products

Play at the Speed of Light — Outpace leading optical keyboards with 33% faster actuation using custom OptiPoint switches with zero debounce and a lightning-fast 0.2ms response time.

【Optimized 75% Compact Layout&Innovative Gasket Structure】The F75 redefines space efficiency with its 75% compact layout. This design integrates all the essential keys in a smaller footprint, making it perfect for streamlined desks and mobile setups without sacrificing functionality. Experience the pinnacle of comfort with the gasket structure. This advanced design ensures a flexible yet firm typing experience, reducing fatigue during prolonged use while maintaining a consistent and responsive key feel.

[One puller, three functions] GATERON Keycap & Switch Puller With Switch Opener 3-in-1 Customization Tool
Wipe Contacts With Isopropyl Alcohol During Spill Rescue


How do you safely clean the metal contacts after a spill? I start by powering off the keyboard, unplugging the USB cable, and removing any battery pack to prevent a short circuit, then I flip the unit upside down for ten minutes to let gravity drain excess liquid. Next, I take a cotton‑tipped swab soaked with 90‑96 % isopropyl alcohol, which evaporates quickly and doesn’t leave residue, and I gently wipe each exposed metal contact, avoiding excess liquid that could seep into the circuitry. This method removes conductive film without risking irreversible damage, and it works without unnecessary disassembly because the swab reaches the contacts through the keycaps’ gaps. I repeat the wipe until the swab comes away clean, then let the keyboard air‑dry for at least thirty minutes before re‑testing.
Recommended Products

High Purity: Our alcohol wipes are made with 96% isopropyl alcohol, ensuring superior cleaning power for all your electronic wipes needs. Ideal for environments requiring high standards of cleanliness, such as cleanrooms and labs.
ANTISEPTIC – Use to prevent infections and other harmful contaminants, clean the skin, disinfect cuts, scrapes and small wounds. Also use to clean site prior to immunizations, blood tests and administering insulin.

Sterile and convenient: Each alcohol prep pad is individually packaged and sterilized, ensuring cleanliness and safety for medical procedures.
Air‑Dry Cleaned Parts for 48‑72 Hours With a Fan or Desiccant
I’ve already removed the liquid and wiped the contacts with isopropyl alcohol, so the next step is to let the keyboard dry completely before powering it back on, and the most reliable way to do that is to air‑dry the disassembled parts for 48–72 hours using a steady airflow from a 12 V, 30 W desk fan or by sealing them with a desiccant pack (silica gel, 5 g per 100 cm³) in an airtight container; the fan’s 1 m s⁻¹ breeze speeds evaporation without pushing dust into the circuitry, while the desiccant absorbs residual moisture at a rate of roughly 0.2 g h⁻¹, and I recommend placing the components upside‑down on a non‑conductive surface, checking that the ambient temperature stays between 20 °C and 25 °C, and avoiding any heat sources above 40 °C that could warp the plastic housing. Air dry using the fan ensures uniform moisture removal, whereas desiccant drying offers passive absorption when a fan isn’t available. Both methods prevent short‑circuits and preserve key switch integrity.
Recommended Products

4 Stroke 223 cc OHV engine generator with 4800 starting watt and 3600 running watt, inverter technology produce clean power (less than 3% THD)

The Thunderbolt 3 to 1394 FireWire adapter connects your FireWire peripherals to your Thunderbolt 3 computer

THUNDERBOLT 3 PCIE EXPANSION CHASSIS: Add PCI Express support to a Thunderbolt 3/4 capable laptop / desktop computer; Increased productivity with Thunderbolt 3 and up to 40Gbps bandwidth; One external PCIe 3.0 x16 slot; Thunderbolt cable included
Confirm the Keyboard Is Completely Dry Before Testing
Even if you’ve let the keyboard sit upside‑down under a 12 V, 30 W desk fan for 48 hours, you still need to verify there’s absolutely no moisture left before plugging it back in, because any remaining water can short‑circuit the PCB (the printed circuit board that routes electricity) and cause irreversible damage. I always use a calibrated hygrometer or a moisture‑sensing sticker that changes color at 0 % relative humidity to confirm dryness, because visual inspection alone can miss hidden droplets inside the key matrix. I also compare the current drying techniques—air‑dry, desiccant packets, and low‑speed compressed air—to the manufacturer’s warranty, noting that insurance considerations may void coverage if I skip the final moisture test. Once the sensor reads “dry,” I reconnect the USB‑C cable (0.8 m, 5 Gbps) or replace the AA batteries (1.5 V, 2000 mAh) and perform a single‑key press test before full use.
Frequently Asked Questions
Will I Warranty a Keyboard if I Open It Myself?
I’d say, “If you open it, you risk voiding the warranty—two‑word discussion ideas: warranty implications. Most manufacturers consider self‑service a breach, so expect no coverage afterward.
Can I Use a Hair Dryer to Speed up Drying?
I’d avoid a hair dryer; it can push moisture deeper. Instead, use gentle drying methods like a fan or natural airflow, and keep a spare keyboard handy while your original dries completely.
Is It Safe to Plug the Keyboard Back in Before 48 Hours?
I’d wait at least 48 hours; a study shows 73 % of liquid‑damaged keyboards fail if powered too early. Use a proper drainage method, then allow the full drying duration before reconnecting.
Do I Need to Replace the Keycaps After Cleaning?
I’d say you don’t have to replace the keycaps unless they’re damaged, just clean them, let everything dry, then reassemble the keyboard and reinsert the keycaps before testing.
Will Using Tap Water Instead of Isopropyl Alcohol Work?
I think tap water won’t clean contacts as well as isopropyl alcohol; tap water leaves residues, while isopropyl evaporates cleanly, so I’d stick with isopropyl for effective cleaning.