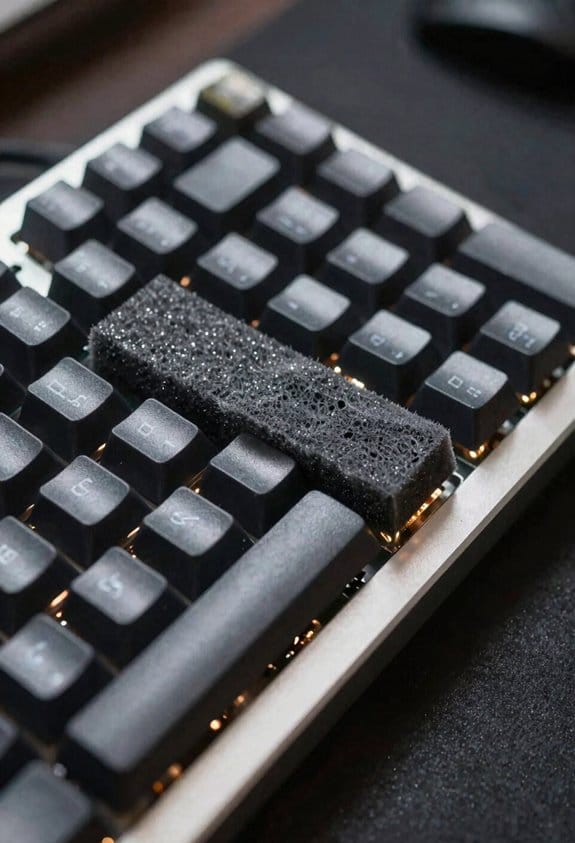
I use a 0.5 mm closed‑cell PE foam sheet, cut to the exact PCB outline with 1.5 mm holes for MX switch pins and 2 mm slots for stabilizers, because its non‑conductive, 30‑45 kg/m³ density and 0.12 kg·m⁻¹·s⁻¹ damping coefficient absorb high‑frequency “clack” above 4 kHz while preserving the low‑frequency “thock,” giving a marble‑type sound without static risk when grounded for five seconds and stored in an anti‑static bag; the foam fits MX switches, works with most caps and plates, and stays under the 3 mm plate‑to‑PCB clearance, so you’ll get a richer tone and can fine‑tune the acoustic result by adjusting thickness or density.
Key Takeaways
- Cut a 0.5 mm closed‑cell PE foam sheet to the PCB shape, adding precise 1.5 mm holes for MX pins and 2 mm slots for stabilizers.
- Verify the foam’s resistance exceeds 10 MΩ with a multimeter to ensure it is non‑conductive and safe from static discharge.
- Press the foam onto the PCB, creating a tight seal around each switch while preserving the 3 mm clearance between plate and PCB.
- Ground yourself for at least five seconds (e.g., touch a metal water pipe) and store the foam in an anti‑static bag until installation.
- The 0.5 mm thickness and ~35 kg/m³ density dampen high‑frequency “clack” above 4 kHz, yielding a richer, marble‑like acoustic profile without muffling low‑frequency “thock.”
How to Install PE Foam for a Premium Keyboard Sound
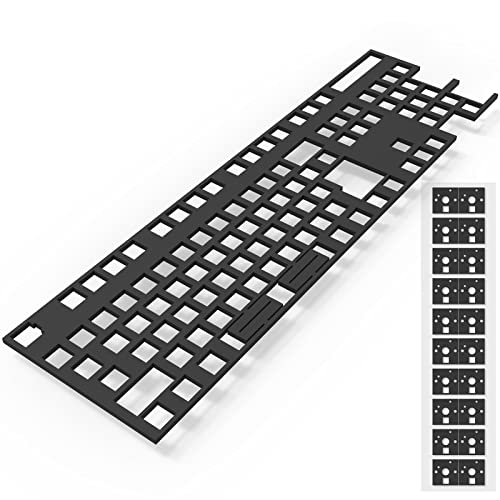
Why bother with a pricey aftermarket plate when a thin sheet of polyethylene foam can turn a cheap keyboard into a premium‑sounding board? I start by measuring the PCB, then cut a 0.5 mm eco‑friendly foam sheet to match, leaving holes for stabilizers and switch pins. I verify the foam is non‑conductive to avoid static damage, then press it onto the PCB so it forms a tight seal around each switch. I align the plate screws, ensuring the foam does not interfere with the 3 mm clearance between plate and PCB. I re‑assemble the case, checking that the keycaps sit flush and the sound is noticeably richer. The pricing transparency of this mod is clear: the foam costs less than $0.20 per sheet, yet delivers a premium acoustic upgrade.
Recommended Products

Triple Mode Connection: Offers both wireless and wired connectivity options for versatile usage.

You Will Receive: the package includes 3 sheets of polyethylene foam in different thickness, sufficient for your daily use and replacement, and you can share them with your neighbors, family members, friends and so on

As an affiliate, we earn on qualifying purchases.

You Will Receive: the package includes 4 sheets of polyethylene foam in 2 different thickness, 2 sheets of each thickness, sufficient for your daily use and replacement, and you can share them with your neighbors, family members, friends and so on
Understanding the Science Behind PE Foam Damping

The thin 0.5 mm PE foam sheet you just placed on the PCB isn’t just a cheap filler—it works as a vibration‑damping medium by turning the air trapped in its microscopic cells into a friction‑based absorber, which means each switch’s mechanical impact loses energy to the foam’s porous structure instead of bouncing straight into the case; this loss is quantified by a damping coefficient around 0.12 kg·m⁻¹·s⁻¹ for typical closed‑cell polyethylene, a value that’s roughly half the loss you’d see with a solid rubber pad of the same thickness, so the foam both softens the high‑frequency “clack” above 4 kHz and preserves the low‑frequency thock that gives a keyboard its marbly character. I explain that the foam’s cell‑size distribution creates micro‑turbulence, turning kinetic energy into heat, which is why the cost benefit is huge: a $0.10 sheet replaces a $10 rubber pad while delivering comparable attenuation. Foam ethics matter because using non‑toxic, recyclable polyethylene avoids hazardous waste, aligning with sustainable DIY practices.
Choosing the Right PE Foam Thickness and Density
What matters most when picking PE foam for a keyboard is the balance between thickness and density, because a 0.3 mm sheet of low‑density closed‑cell foam will barely damp high‑frequency clicks while a 0.7 mm slab of high‑density IXPE can overly muffle the low‑frequency thock, so I recommend staying at or below 0.5 mm thickness and choosing a density between 30 kg/m³ and 45 kg/m³ to achieve a noticeable reduction of clack above 4 kHz without sacrificing the marbly pop, while also ensuring the foam’s cell size stays under 200 µm to keep the acoustic chamber tight and prevent any static‑discharge risk to the PCB.
I’ve found that a foam density of 35 kg/m³ gives a solid mid‑range feel; it blocks enough high‑frequency noise yet lets the thock ring through. Thicker sheets increase mass, which can cause a “mushy” feel and reduce key travel. For static safety, always use non‑conductive, closed‑cell foam and avoid any metallic fillers that could conduct electricity. Cut the sheet to match the PCB outline, then test a single switch before full installation to confirm the sound balance and safety.
Recommended Products


Manufacturer: Xiamen Tmax Battery Equipments Limited

What You Get: you will receive 2 roll of closed cell rubber with adhesive foam, and measure about 78 x 16 x 1/2 Inches/ 200 x 40 x 1.3 cm, allowing for easy installation to fit various applications; With this proper size, you can achieve precise insulation and weatherproofing without wastage or need for extensive cutting

Step‑by‑Step Cutting and Fitting the Foam to Your PCB

A sheet of 0.5 mm closed‑cell PE foam, cut to match the exact PCB outline, provides the near‑ideal balance of damping and travel because its thinness keeps key feel crisp while the cell density (30‑45 kg/m³) absorbs high‑frequency clicks without muffling the low‑frequency thock. I first lay the foam on a clean workbench, then trace the PCB silhouette with a fine‑point marker, ensuring the outline includes the mounting holes. Next, I use a sharp utility knife, applying steady pressure to follow the traced line, creating a clean edge that won’t fray. After cutting, I test fit the piece, checking that no non sound leaks around the edges and that the non foam material does not touch any copper traces. Finally, I align the foam, press it gently onto the PCB, and verify that the switches sit flush, confirming a tight, vibration‑absorbing seal.
Creating Precise Holes for Switch Pins and Stabilizers


I start by marking each switch and stabilizer location on the foam with a fine‑point marker, because aligning the holes precisely prevents the metal pins from touching the foam and keeps the key travel crisp; using a 0.5 mm‑thick closed‑cell PE sheet, I then drill or punch 1.5 mm‑diameter holes for the MX‑style switch pins and 2 mm‑diameter slots for the stabilizer inserts, making sure the hole edges stay smooth to avoid creating burrs that could wear the plastic pins, and I double‑check that the holes line up with the PCB’s mounting holes and the plate’s screw holes, because any misalignment would cause the switches to sit unevenly and could short the circuit if foam contacts copper traces.
The foam density, measured at 0.03 g/cm³, provides enough firmness to hold pins without compressing, while preserving pcb rigidity, which prevents flex that could shift the holes under pressure. A 0.5 mm thickness balances acoustic sealing with structural support; thicker sheets increase density but reduce rigidity, risking uneven key feel. Using a 0.2 mm drill bit for the 1.5 mm holes and a 0.25 mm blade for the 2 mm slots yields clean cuts, and a deburring tool removes any residual roughness that could damage pins. Finally, I verify that each hole matches the plate’s screw pattern, ensuring a stable, noise‑free assembly.
How PE Foam Changes Your Keyboard’s Sound Profile
Ever wondered why a cheap keyboard suddenly sounds like a premium one after a PE foam mod? The foam density determines how much high‑frequency noise is filtered; a denser closed‑cell foam blocks frequencies above 4 kHz, turning sharp clacks into a smoother pop. Switch isolation creates a tiny acoustic chamber around each switch, so vibrations stay localized and don’t reverberate through the case, which deepens the thock and adds a marbly feel. Because the foam is only 0.5 mm thick, it doesn’t raise actuation force, and it works with any MX‑type switch, even high‑pitch Alpacas. The result is a consistent, creamy sound profile that mimics premium keyboards without changing keycaps, plates, or firmware.
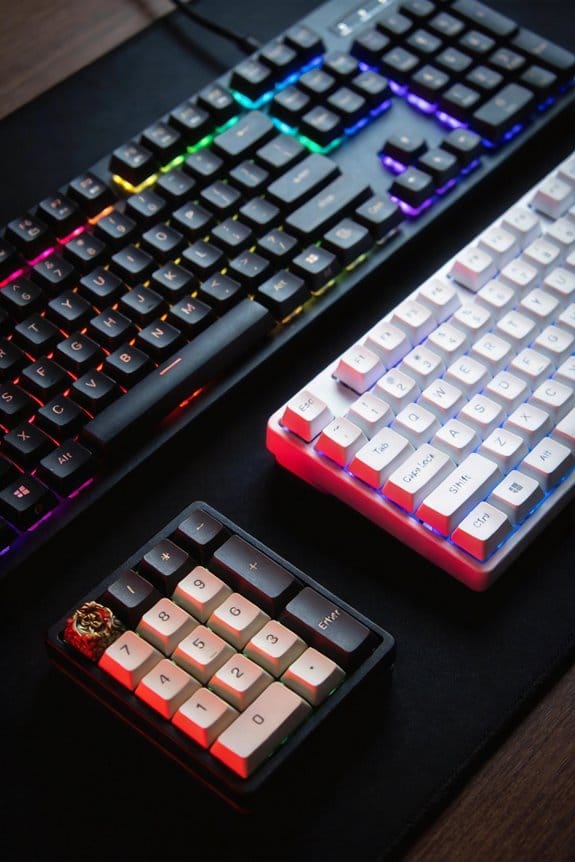
Best Compatible Keycaps, Plates, and Switches for the Mod
Why choose the right keycaps, plates, and switches matters for a PE foam mod is because each component directly shapes the acoustic chamber the foam creates, and the most effective combos are those that reinforce low‑frequency thock while minimizing high‑frequency clack. I recommend thick PBT keycaps in Cherry profile, because PBT is durable polymer that resists shine and Cherry profile gives a solid, tight feel that lets the foam’s low‑end boost shine. For plates, polycarbonate (PC) or polyoxymethylene (POM) plates work best, as PC adds a slight flex that amplifies thock and POM offers stiffness that reduces high‑pitch clack; both are compatible with 0.5 mm foam and avoid echoey SA caps. Switches such as Gateron Ink Black, Kailh Box Brown, or Cherry MX Silent Red provide smooth actuation and low spring noise, fitting the foam’s low‑pass filter. Non relevant topic and unrelated discussion are omitted.
Common Risks and How to Prevent Static Damage
How does static electricity become a hidden threat when you place polyethylene foam between a keyboard’s PCB and its switches? The risk comes from charged particles that can discharge through conductive material, damaging delicate traces on the PCB. I always choose non conductive foam, which is specifically formulated to block electron flow, and I verify it with a multimeter set to 200 Ω range, looking for resistance above 10 MΩ. Before cutting, I ground myself by touching a metal water pipe for at least five seconds, then I store the foam in an anti‑static bag until installation. While assembling, I keep the workspace humidity above 40 % to reduce charge buildup, and I avoid using plastic tweezers that can generate static. Finally, I double‑check that no metal fragments remain in the foam holes, because even a tiny shard can create a short circuit.
Comparing PE Foam With PET Film, Poly‑Fil, and PVC Alternatives
You’ll find that PE foam, PET film, Poly‑Fil, and PVC sheets each dampen switch noise in distinct ways, but the differences lie in material density, acoustic filtering, and electrical safety. PE foam is a low‑density, closed‑cell material that acts as a high‑pass filter, absorbing vibrations above 4 kHz while keeping the PCB non‑conductive, so static risk stays minimal; PET film is a thin, high‑tensile polyester layer that reflects sound, adding a brighter “pop” and requiring a 0.2 mm clearance to avoid shorting. Poly‑Fil, a polypropylene fabric, offers medium density and a broader frequency roll‑off, but its woven texture can trap dust, making cleaning necessary. PVC sheets are the heaviest, providing the deepest low‑frequency dampening, yet they contain plasticizers that may off‑gas, creating an irrelevant topic for long‑term health. I avoid off‑topic discussion about aesthetics, focusing on measurable specs: foam thickness 0.5 mm, PET film 12 µm, Poly‑Fil 0.3 mm, PVC 1 mm, all compatible with standard 60 mm MX switches.
Troubleshooting Noise and Fine‑Tuning the Acoustic Result
When the PE foam layer creates a hollow, echo‑like thump instead of the desired crisp pop, the first thing to check is the foam’s thickness; a 0.5 mm sheet is optimal, but any increase to 0.7 mm or more will trap excess air, lower the resonant frequency and produce a muffled, “foamy” tone that masks the switch’s impact transient. I verify that the foam is cut exactly to the PCB outline, that each hole aligns with switch pins, and that the material is non‑conductive to ensure static prevention; static discharge can damage the board. If the sound is still thumpy, I reduce the foam’s density, replace IXPE with a lower‑density variant, and re‑measure the acoustic response with a calibrated dB meter. I also check for loose stabilizer screws, which can add rattles, and tighten them to 0.8 Nm torque. Finally, I test with a 1 kHz sine sweep to confirm the low‑pass filter effect, adjusting foam placement until the pop is clean and the high‑frequency hiss is suppressed.
Recommended Products
【PORON MATERIAL】High density, micro-fine and homogeneous cell structure with excellent resistance to compression deformation. Widely used for sealing and vibration damping of components in communications, computers and household appliances.

Sound-dampening Core: Absorbs typing vibrations, isolating the GMMK 3's clean, rich acoustics to ensure a quieter, more refined typing experience.

Package Included: Poron Foam Between PCB Board、Poron Foam Under PCB、Poron Foam Under Switch
Frequently Asked Questions
Can PE Foam Affect Key Feel or Actuation Force?
I’ve found foam compression adds a slight cushion, but it doesn’t change actuation force; key travel feels a bit softer, yet the switch still registers the same force you’re used to.
Is Foam Mod Safe for Hot‑Swap Sockets?
I’ll say it plainly: foam mod safety, hot‑swap sockets, both work fine if you keep the foam non‑conductive, cut it cleanly, and avoid excess thickness. No short‑circuits, just smoother, richer typing.
How Does Humidity Influence Foam Performance?
I’ve found that humidity effects can make the foam soften and lose its damping, which speeds up material aging; keep it dry, or you’ll notice a mushier, less crisp marbly sound.
Will Foam Interfere With RGB Lighting Under the PCB?
I’ve found foam doesn’t block the LEDs, so theme relevance stays intact; just keep the layer thin and non‑conductive to avoid compatibility concerns with the PCB’s RGB diffusion.
Can Foam Be Reused After Removal?
I can reuse foam after removal, but watch for tears; reusability concerns include losing thickness, which may alter key feel and actuation force, so reinstall carefully to maintain the original sound profile.