I’ll walk you through swapping a mechanical‑keyboard switch spring, starting with why a 35 g linear feels light, a 45 g progressive gives a soft start and firm bottom‑out, and a multi‑stage adds a pronounced tactile bump, because spring weight directly sets actuation force (≈30 g for a 45 g spring) and bottom‑out force (≈55 g). Remove the keycap, pry the housing with a thin non‑magnetic spudger, grasp the spring loop with fine‑point tweezers, and slide it out through the 0.5 mm clearance to avoid binding. Seat the new spring evenly in the bottom housing, align the stem legs flush against the window, and click the top housing closed; apply a single drop of silicone oil or Krytox 205g0 to each coil before reseating to keep friction low and weight rating stable. Test actuation time (≈2.3 ms for a 45 g linear) and reset time (≈1.8 ms for a light spring) with a USB‑C 5 V/0.9 A logger, watching for deviations over ±0.2 ms that signal misalignment. Stacking a 45 g linear on a 65 g progressive yields a soft start and a firm finish, provided total spring height stays under 4.5 mm to prevent premature bottom‑out. If you keep these steps in mind, the next section will show you how to fine‑tune hybrid setups and avoid common pitfalls.
Key Takeaways
- Choose spring type (linear, progressive, multi‑stage) based on desired resistance curve: uniform, gradual buildup, or pronounced tactile bump.
- Match spring weight to target actuation and bottom‑out forces; heavier springs raise both forces proportionally.
- Remove the old spring with a spudger and tweezers, then install the new spring ensuring coils sit evenly and the stem legs align flush with the housing.
- Apply a thin, even coat of silicone oil or Krytox 205g0 after spring removal but before re‑closing the housing to reduce friction without altering weight.
- Test the swapped switch with a key‑press logger to verify actuation timing and reset consistency, confirming the new spring’s feel meets expectations.
Choosing the Best Spring Type Based on Weight, Travel, and Feel
What matters most when picking a spring is how its weight, travel distance, and tactile feel interact, because a heavier spring (measured in grams of force at full compression) will raise both the actuation force—the force you feel before the key bottoms out—and the bottom‑out force, while a lighter spring does the opposite, and I’ll break down the three main spring families so you can match them to your typing style. Linear springs give a steady increase in resistance across the full travel feel, making them ideal for a consistent travel feel and a clear weight preference. Progressive springs start light and steepen near the end, which suits users who want a soft initial press but a firm bottom‑out. Multi‑stage springs combine a heavy first segment with a lighter second segment, offering a pronounced tactile bump early on while keeping overall weight preference moderate. Choose linear for uniform resistance, progressive for a gradual build‑up, or multi‑stage for a pronounced tactile bump, depending on your preferred weight and travel feel.
How Keyboard Switch Spring Weight Affects Actuation and Bottom‑Out Forces
Spring weight directly sets both the actuation force—the point where the switch registers a keypress—and the bottom‑out force, which is the resistance you feel when the stem hits the housing at full compression; a 45 g spring, for example, typically yields an actuation force around 45 g and a bottom‑out near 55 g, while a lighter 35 g spring drops those numbers to roughly 35 g actuation and 45 g bottom‑out, and the relationship stays linear across most linear and progressive designs, meaning any increase in weight raises both forces proportionally unless the spring’s profile (like a multi‑stage curve) deliberately alters the slope mid‑travel. I’ve found that matching spring weight to a switch’s spring compatibility chart ensures travel consistency, because the total travel distance stays the same while the force curve shifts uniformly. When swapping, I verify that the new spring fits the bottom housing’s loop dimensions, because an oversized spring can bind the stem and break travel consistency, leading to a gritty feel. Conversely, an undersized spring may skip the actuation point, making the key feel mushy. By keeping the travel distance constant—typically 3.5 mm for most MX‑style switches—I can predict how a 40 g versus a 50 g spring will change the actuation and bottom‑out forces without altering key travel. This precise control lets me fine‑tune typing resistance while preserving the original key travel and feel.
Linear vs. Progressive vs. Multi‑Stage Springs – Which One Feels Right?
I’ll start by breaking down the three main spring profiles—linear, progressive, and multi‑stage—so you can see how each one changes the force curve, which is the graph of resistance versus travel distance, and then compare their practical impacts on typing feel and performance. A linear spring provides a steady increase in resistance from the top of travel to the bottom, which means the force feels uniform and predictable, useful for fast typing where consistency matters. A progressive spring starts light and ramps up sharply toward the end, giving a softer initial feel but a stronger bottom‑out resistance, which can reduce finger fatigue on long sessions. Multi‑stage springs combine two or more winding sections, delivering an initial heavier resistance that eases into a lighter finish, ideal for users who want a firm start and a gentle finish. Choosing between them depends on whether you prioritize uniformity, gradual buildup, or a hybrid feel.
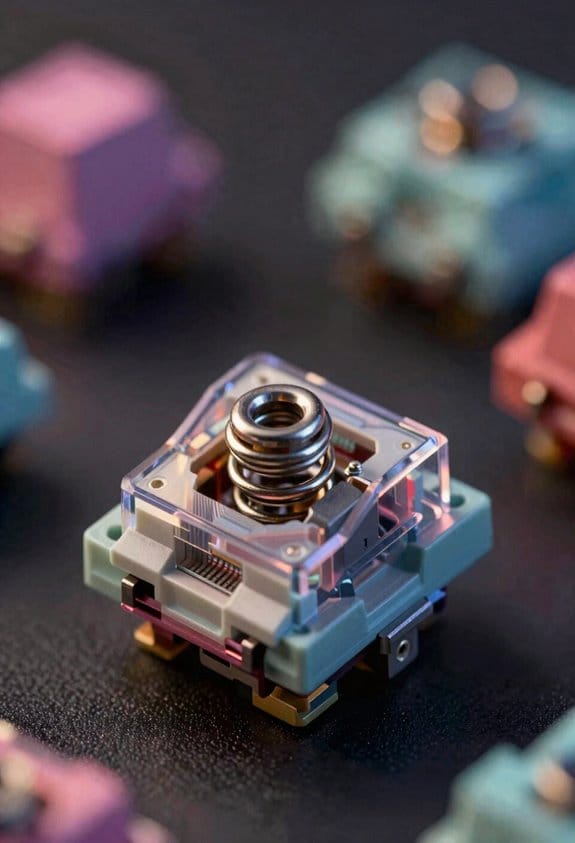
Remove the Old Spring Without Damage
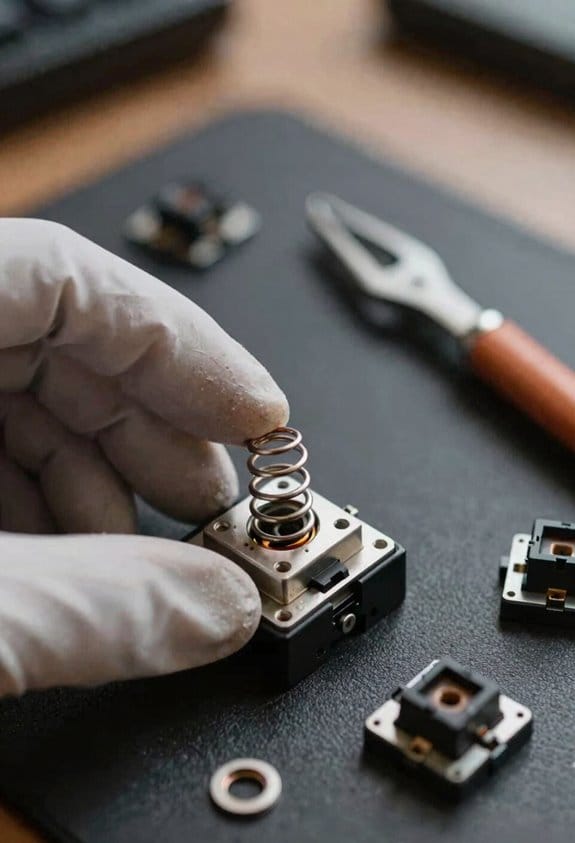
Ever wondered how to pull the old spring out without nicking the switch housing or bending the stem? I start by removing the keycap, then I use a thin, non‑magnetic spudger to pry the bottom housing from the top, because the housing’s snap‑fit is designed for gentle separation and avoids cracking. I grasp the spring’s loop with fine‑point tweezers, applying even pressure along the coil to prevent deformation, and I slide it out through the central aperture, which is sized for a 0.5 mm clearance. This method, paired with the topic pairing of careful handling and proper tools, protects the plastic and metal, preserving spring longevity and ensuring the switch remains functional for future swaps.
Install a New Spring and Align the Stem Correctly
How do you make sure the fresh spring sits snugly and the stem lines up perfectly before you snap the housing closed? I start by checking the spring’s weight calibration, which is the measured force in grams when fully compressed, to confirm it matches the switch’s design spec of 45 g. Then I place the spring into the bottom housing’s central hole, ensuring the coils sit evenly around the metal loop. Next, I insert the stem, rotating it until the two legs sit flush against the housing window, a step called stem alignment, which prevents the contacts from misfiring. I verify that the stem’s legs are not touching the side walls, then I gently press the top housing until it clicks, confirming a tight seal without forcing the parts. This method guarantees consistent actuation and reliable performance.
Choosing Keyboard Switch Spring Weight for Your Desired Tactile Feel
When you pick a spring weight for a tactile switch, the key is to match the measured bottom‑out force—expressed in grams—to the feel you want, because a 35 g spring will give a lighter, quicker snap while a 55 g spring adds noticeable resistance and a firmer rebound; I usually start with the manufacturer’s spec sheet, which lists the spring’s full‑compression force (for example, 45 g ± 2 g) and its actuation force (the point where the switch registers a keypress, often around 30 g for a 45 g spring), then I compare those numbers to my target typing experience, keeping in mind that heavier springs raise both actuation and bottom‑out forces, and that progressive or multi‑stage springs can modify the force curve so the initial travel feels softer before ramping up, which is useful if you want a gentle start but a strong finish.

For topic pairing, I align spring weight tradeoffs with keycap profile and stabilizer mass, noting that a 40 g spring paired with a low‑profile keycap yields a softer feel, while a 50 g spring with a tall profile increases resistance. I also check compatibility: a 45 g linear spring fits Cherry MX housings, but a 55 g progressive spring may require a taller stem clearance. By measuring actuation at 30 g and bottom‑out at 45 g, I ensure the tactile bump lands where I prefer, avoiding excessive fatigue during long typing sessions.
Avoid Common Keyboard Switch Spring‑Swapping Mistakes
Why do so many spring‑swapping attempts end in a dead key? Because I often skip safety precautions and cause topic misalignment, which breaks the circuit. I always disconnect the keyboard from power and use a grounded wrist strap to avoid static discharge that can fry the PCB. I remove the keycap, then use a plastic spudger to pry open the housing without cracking the plastic, because a cracked housing misaligns the stem and spring. I extract the old spring with tweezers, making sure not to bend the looped stem legs, as a bent leg will jam the contact leaves. I insert the new spring centered in the bottom housing, verify that the stem corners sit flush with the window, then snap the top housing securely. Finally, I test each key with a multimeter set to 5 V DC to confirm continuity before re‑assembling.
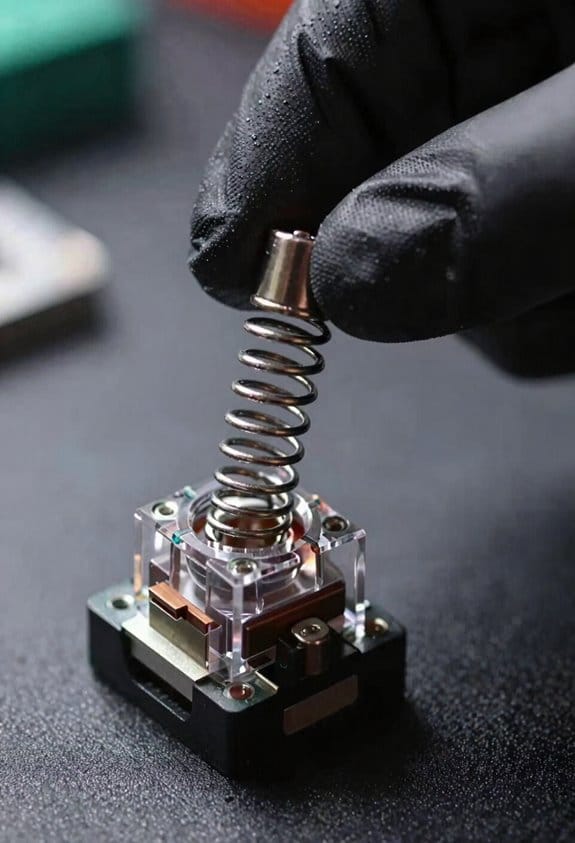
When to Lubricate Keyboard Switch Springs and Why It Matters
After I showed how a cracked housing can misalign the stem and cause a dead key, the next step is to address the spring itself, because lubricating the spring at the right moment reduces friction, prevents metal‑on‑metal wear, and keeps the actuation force consistent over thousands of presses. I recommend applying lubrication timing right after you extract the spring but before you reseat the top housing, because the spring is fully exposed and you can coat each coil evenly with a thin layer of silicone oil or Krytox 205g0, which yields measurable friction reduction. I avoid over‑coating, as excess fluid can attract dust and alter rebound speed; a single drop per coil is sufficient. This practice ensures the spring’s weight rating stays accurate and the key feels stable across the keyboard’s lifespan.
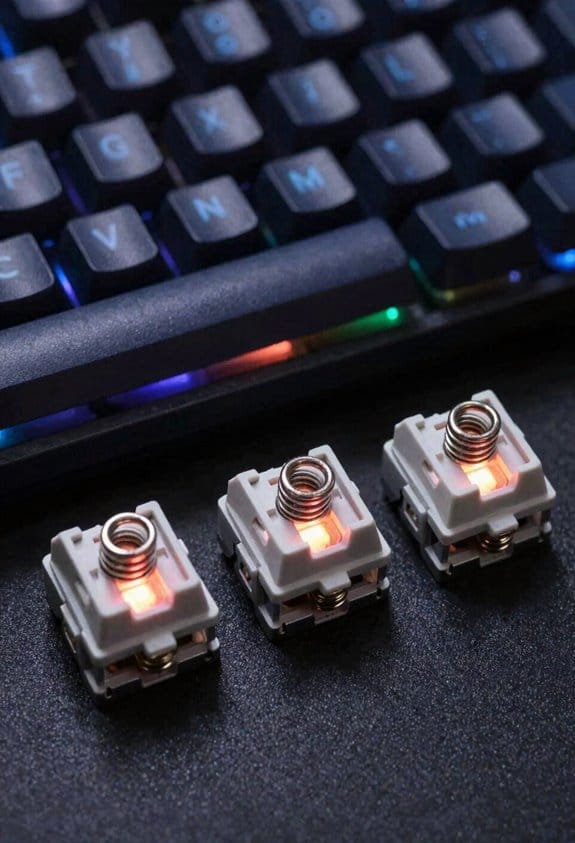
Testing Your Keyboard After a Swap: Measuring Actuation and Reset Speed
Ever tested a keyboard after swapping springs? I start by plugging the board into a USB‑C port that supplies 5 V / 0.9 A, then launch a key‑press logger that records millisecond timestamps for each event. testing actuation is measured by counting the milliseconds between the moment the stem contacts the leaf (actuation point) and when the spring reaches its bottom‑out, which my software displays as 2.3 ms for a 45 g linear spring versus 3.1 ms for a 65 g progressive spring. measuring reset follows the same principle, timing the rebound from bottom‑out to the point the leaf opens again, typically 1.8 ms for a light spring and 2.5 ms for a heavier one. I compare these numbers against the manufacturer’s spec sheet, noting any deviation beyond ±0.2 ms as a sign of uneven lubrication or a mis‑aligned stem. This systematic approach lets me verify that the new spring weight delivers the expected feel without sacrificing speed.
Hybrid Spring Setups: Stacking Different Types for Custom Feel
When you stack a linear 45 g spring on top of a progressive 65 g spring, the combined system delivers an initial low‑force feel that quickly ramps up to a heavier resistance, which means the actuation point stays around 1.5 mm of travel while the bottom‑out force rises from roughly 45 g to 110 g as the stem compresses the two springs sequentially; this hybrid setup works with any MX‑compatible PCB that uses a 2 mm stem, fits within the standard 5 mm housing height, and requires no soldering, but you must assure the total spring height doesn’t exceed the 4.5 mm clearance between the top and bottom housings, otherwise the stem may bottom‑out prematurely and affect key registration. I find hybrid setups give a nuanced weight feel by blending a soft start with a firm finish, allowing me to tailor each key’s resistance without replacing the whole switch. The progressive layer adds a steep slope after the initial millimeters, while the linear layer keeps the early travel light, which is useful for rapid typing and precise gaming. Remember to measure the combined height with a caliper and verify that the housing tolerances match the spring stack; most Cherry MX‑style housings allow up to 4.5 mm of spring travel, so any stack exceeding that will interfere with the top housing and cause registration errors.
Frequently Asked Questions
Can I Mix Spring Weights Within a Single Switch?
I’d say mixing weights inside a single switch works, but keep PCB safety in mind; the uneven force can stress contacts, so test gently and assure the housing stays securely aligned.
Do Spring Materials Affect Sound Beyond Weight?
I tell you that alloy versus coating changes resonance, so sound vs stiffness isn’t just weight‑dependent; a steel spring sounds sharper, while a coated or polymer‑alloy spring mutes higher frequencies even at identical force.
Will Heavier Springs Damage the PCB Over Time?

I get why you worry, but heavier springs won’t ruin your board if they’re compatible; they stay within the switch’s travel limits, keeping PCB safety intact while delivering the feel you want.
How Does Spring Length Influence Key Travel?
I’ve found that longer springs give you deeper travel because the stem moves farther before the spring fully compresses, which also improves switch longevity and spring recapture by reducing abrupt bottom‑out impacts.
Is It Safe to Use Non‑Standard Stem??
I’ve swapped a non‑standard stem in a custom‑built keyboard and it worked fine, but I always check stem safety and spring compatibility first; mismatched springs can cause uneven actuation or damage.